Overview
- Welcome to Sisitech Flutter Forms, your go-to library for simplifying form management in cross platform development.
- Built as an evolution of Sisitech MyForms initially designed for Angular, Sisitech Flutter Forms streamline your form-related tasks with ease and efficiency while bringing a seamless offline-first approach to Flutter development.
Explore the following sections of this documentation to get started with Sisitech Forms:
- Getting Started: Learn how to install and set up Sisitech Forms in your project.
- Usage: Discover how to create, customize, and work with forms using our library.
- Under the Hood: Dive into the details of the library's functions, classes, and components.
- Examples: See real-world examples of Sisitech Forms in action.
Getting Started
Adding Package to pubspec.yaml
- In your
pubspec.yamlfile, under the list of app dependencies, add the following lines:
Adding Dependencies to pubspec.yaml
- Flutter forms has two key dependencies i.e GetX and flutter_utils by Sisitech.
GetX package
flutter_utils package
- Save the file to run
flutter pub getwhich will fetch the package from Sisitech's repository. - Once done, VOILA! you have installed the package in your project!
Usage
- This section aims to demonstrate how to create a simple form in flutter using Flutter Forms. We will be using the login use case for an application to demonstrate it's use.
- Creating a form with Flutter Forms is pretty straightforward. The steps outlined below shows the example usage described above.
Controller Initialization
- First is to initialise the controllers from flutter_forms necessary to make MyCustomForm run.
- The
APIConfigcontroller is used to define the API details for the HTTP calls to be made by the forms. - The
NetworkStatusControlleris used to access functions to do with checking internet connections to manage the offline-first quality of flutter_forms. - The
OfflineHttpCacheControlleris used to manage the http calls that are stored by flutter_forms when the device is offline. - The three controllers are initialised using
Get.putinmain.dart. The code block below shows an example of how to do so:
main.dart
void main() async {
  ...

  Get.put<APIConfig>(
    APIConfig(
        apiEndpoint: "https://dukapi.roometo.com",
        version: "api/v1",
        clientId: "NUiCuG59zwZJR14tIdWD7iQ5ILFnpxbdrO2epHIG",
        tokenUrl: 'o/token/',
        grantType: "password",
        revokeTokenUrl: 'o/revoke_token/'),
  );
  Get.put(NetworkStatusController());
  Get.put(OfflineHttpCacheController());

  ...
}
Dart Code
- Next is to define the widget for FLutter Forms i.e.
MyCustomFormand the associated parameters. The code block shows how to do so:
auth/login/login.dart
    MyCustomForm(
        formItems: loginOptions,
        enableOfflineMode: true,
        formTitle: "Login",
        storageContainer: "school",
        url: "o/token/",
        submitButtonPreText: "",
        submitButtonText: "Login",
        loadingMessage: "Signing in...",
        handleErrors: (value) {
        debugPrint("Error in $value");
        if (value != null) {
            return "Your password might be wrong".ctr;
        }
        return null;
        },
        instance: const {
        "username": "myadmin",
        "password": "#myadmin",
        "client_d": "NUiCuG59zwZJR14tIdWD7iQ5ILFnpxbdrO2epHIG",
        "grant_type": "password",
        },
        onSuccess: (res) async {
        debugPrint("Received");
        },
        onOfflineSuccess: (res) async {
        debugPrint("Success login.");
        debugPrint(res);
        await Future.delayed(const Duration(milliseconds: 1000));
        debugPrint("Done");
        },
        contentType: ContentType.form_url_encoded,
        extraFields: {
        "client_id": config.clientId,
        "grant_type": config.grantType,
        },
        formGroupOrder: const [
        ["username"],
        ["password"]
        ],
        name: "Signupdada",
    )
- MyCustomForm takes several parameters, few of which are required. The table below highlights all the parameters and details about them:
| Parameters | Is Required | Description | Example | Default Value |
|---|---|---|---|---|
| name | ✅ | Name of the instance of the form. | "userRegistrationForm" |
- |
| formGroupOrder | ✅ | List of input names that determine the order of the input fields to be displayed. | ["email", "password"] |
- |
| formTitle | X | Title displayed at the top of the form. | "Login" |
- |
| formItems | X | Default formOptions used to determine the types of text form fields rendered. | Appendix: Default Options | Appendix: Default Options |
| formHeader | X | Header widget to be displayed above the form. | MyCustomFormHeader() |
- |
| showOfflineMessage | X | Whether to display an offline mode message. | true or false |
true |
| enableOfflineMode | X | Enable offline mode for the form. | true or false |
false |
| enableOfflineSave | X | Enable saving data in offline mode. | true or false |
false |
| validateOfflineData | X | Function to validate offline data. | (data) => data.isNotEmpty |
- |
| customDataValidation | X | Custom data validation function. | (data) => customValidationLogic(data) |
- |
| displayRequiredFieldsOnValidate | X | Display required fields during validation. | true or false |
true |
| formFooter | X | Footer widget to be displayed below the form. | MyCustomFormFooter() |
- |
| formTitleStyle | X | Style for the form title. | TextStyle(color: Colors.blue) |
- |
| extraFields | X | Extra fields to be added as part of form data on submission. | { "field1": "value1", "field2": "value2" } |
- |
| isValidateOnly | X | Perform onSuccess function without making HTTP call. | true or false |
false |
| url | X | The request URL to submit form data. | "https://api.example.com/submit" |
- |
| getOfflineName | X | Function to get the offline storage name. | () => "userFormOfflineData" |
- |
| onOfflineSuccess | X | Callback function on successful offline data submission. | () => print("Offline data submitted") |
- |
| PreSaveData | X | Function to pre-process data before saving. | (data) => preProcessData(data) |
- |
| storageContainer | X | Name of the storage container used to store formData. | "auth" |
"auth" |
| offlineStorageContainer | X | Name of the storage container used to store offline form data. | "localAuth" |
"localAuth" |
| onStatus | X | Callback function used to update form status (determines HTTP Method to be used). | (status) => print("Form status: $status") |
- |
| instanceUrl | X | URL instance for dynamic form URLs. | "https://api.example.com/" |
- |
| getDynamicUrl | X | Function to dynamically generate form submission URL. | (data) => "https://api.example.com/$data" |
- |
| onFormItemTransform | X | Callback function to transform form items into FormFieldItem objects. | (item) => transformFormItem(item) |
- |
| onControllerSetup | X | Callback function for setting up controllers. | (controller) => setupController(controller) |
- |
| status | X | Initial status of the form (determines HTTP Method to be used). | FormStatus.Update |
FormStatus.Add |
| loadingMessage | X | Loading message displayed during form submission. | "Submitting data, please wait..." |
"Loading ..." |
| handleErrors | X | Function to handle errors during form submission. | (error) => print("Error: $error") |
- |
| submitButtonText | X | Text to display on the form submission button. | "Submit" |
- |
| onSuccess | X | Callback function on successful form submission. | () => print("Form submitted successfully") |
- |
| instance | X | Instance of data to be used to determine instance URLs or form data details. | Appendix: Instance | Appendix: Instance |
| submitButtonPreText | X | Additional text to display before the submit button. | "Confirm" |
- |
| contentType | X | Content type for form data submission (e.g., ContentType.json). |
ContentType.form or ContentType.json |
ContentType.json |
Options File
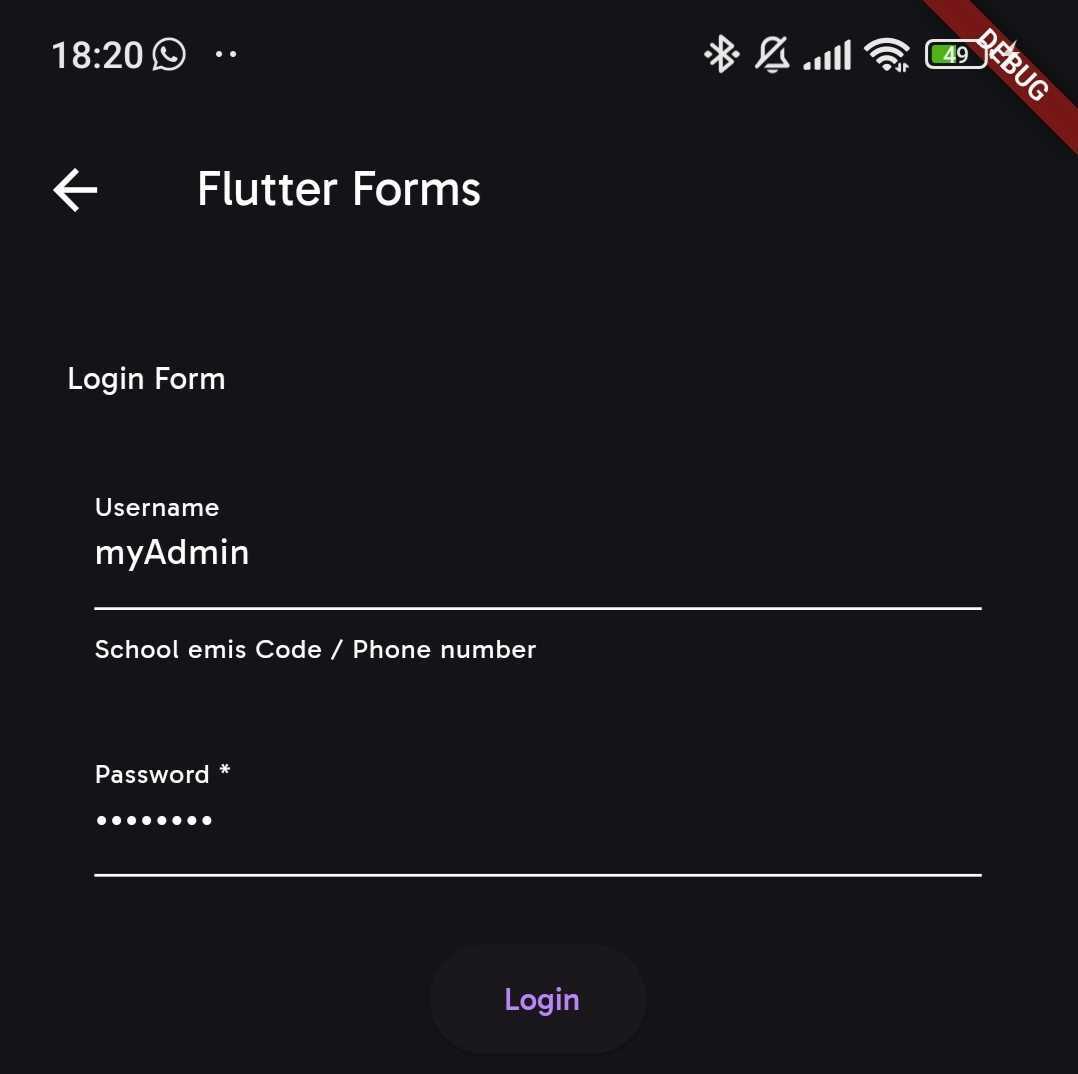
- The options file is used to determine the properties the input form fields in our form will have. The code block below shows how to define an options to be passed to
form_items:
auth/login/loginOptions.dart
const loginOptions = {
  "name": "List Create Shops Api",
  "description": "",
  "renders": ["application/json", "text/html"],
  "parses": [
    "application/json",
    "application/x-www-form-urlencoded",
    "multipart/form-data"
  ],
  "actions": {
    "POST": {
      "username": {
        "type": "string",
        "required": false,
        "read_only": false,
        "label": "Username",
        "max_length": 45,
        "placeholder": "School emis Code / Phone number"
      },
      "password": {
        "type": "string",
        "required": true,
        "read_only": false,
        "label": "Password",
        "obscure": true,
        "max_length": 25
      }
    }
  }
};
- The code above renders the following screen:
Useful Links: >
More examples of various forms using more of these parameters are outlined in the Flutter Forms Examples documentation.
To really understand what these parameters are and how they work, checkout the Under The Hood to learn more.
Appendix
Default Options
Example Instance
const Map<String, dynamic>  instance = {
        "id": 12,
        "username": "myadmin",
        "password": "#myadmin",
        "client_d": "NUiCuG59zwZJR14tIdWD7iQ5ILFnpxbdrO2epHIG",
        "grant_type": "password",
        },