Usage
- In this tutorial, we will use a hospital records management system to demonstrate the library's usage. The example below shows an example to render a patient records table.
Backend Integration
- Import the
TablesModulefrom@sisitech/tablesin yourapp.module.ts.
  import { TablesModule } from '@sisitech/tables';

  @NgModule({
    imports: [
      // ...
      TablesModule.forChild(authConfig),
    ],
  })
- Configure
authConfigwith the appropriate authentication settings for your backend API.
Frontend Integration
In your component's HTML file (e.g., immunize.component.html), use the <my-app-tables> element to display your data table. Customize it according to your needs. Here's a sample usage:
<div class="">
  <my-app-tables
    [alerts]="alerts"
    deletePreText="Do you wish to delete"
    deleteFieldDisplayField="@name"
    [enableView]="true"
    [enableDelete]="true"
    [enableAdd]="enableDelete"
    [formFilters]="formFilters"
    [args]="args"
    [listTypeUrl]="url"
    (actionsEvent)="handleActions($event)"
    [headers]="myHeaders"
    searchFieldName="name"
    searchFieldNameMessage="Name"
    [enableOrderBy]="enableOrderBy"
    (onStatusChange)="onDeleteStatus($event)">
  </my-app-tables>
</div>
MyTables Inputs
Here is a breakdown of the different inputs passed to MyTables:
| Inputs | Is Required | Description |
|---|---|---|
listTypeUrl |
✅ | URL to fetch data for the table. |
headers |
✅ | Configuration for table headers. |
alerts |
x | An array of alerts for user notifications. |
deletePreText |
✖️ | Text displayed before a delete confirmation message. |
deleteFieldDisplayField |
✖️ | Field used to display data for delete confirmation. |
enableView |
✖️ | Enable viewing details of table entries. |
enableDelete |
✖️ | Enable deleting entries from the table. |
enableAdd |
✖️ | Enable adding new entries to the table. |
formFilters |
✖️ | Filters for the table. |
args |
✖️ | Additional arguments for the table. |
searchFieldName |
✖️ | Field used for searching. |
searchFieldNameMessage |
✖️ | Message displayed for the search field. |
enableOrderBy |
✖️ | Enable sorting by columns in the table. |
MyTables Configuration
- This section includes the initialization of variables, such as
dataMapandalerts. ThengOnInitmethod is called when the component is initialized. - The class members below define configuration settings for
MyTables, such asargs,enableDelete,enableOrderBy,url, andinstance.
Handling Filters
- The onFilters method is called when filters are applied, and it updates the formFilters variable.
MyHeaders Configuration
- The
myHeadersarray contains configuration for table headers. You can define how each column should be displayed here. - The
myHeadersarray in your component specifies the configuration for table headers. Each item in the array defines how a column should be displayed. For example: "source"represents the field name in your data source."name"is the display name for the column."source_func"allows you to apply custom formatting to the data."source_interpolated"lets you combine multiple fields for display.
  myHeaders = [
     {
      "source": "id",
      "name": "Patient ID"
    },
    {
      "source_interpolated": "@first_name @middle_name# @last_name#",
      "name": "Full Name"
    },
    {
      "name": "Created FUnc",
      "source_func": (val: any) => {
        var date = "@created#".interpolate(val).split("T")[0]
        return date.toDateDisplay()
      }

    },
    {
      "source": "dob",
      "name": "Date Of Birth"
    },
    {
      "source": "gender",
      "name": "Gender"
    },
    {
      "source": "guardian_name",
      "name": "Guardian Name"
    },
    {
      "source": "guardian_phone",
      "name": "Guardian Phone"
    },
  ]
Handling Deletion Status
- The
onDeleteStatusmethod handles deletion status. It updates thealertsarray with a notification when a vaccine is deleted.
  onDeleteStatus(instance: any) {
    if (typeof instance != "boolean") {
      this.alerts = [
        {
          options: { level: "danger" },
          message: "Vaccine  @name# deleted.",
          instance: instance,
        }
      ]
    }
  }
Handling Actions
- The
handleActionsmethod is called when actions are triggered in the table, such as editing or viewing details. - It navigates to the appropriate routes and interacts with the view modal.
  async handleActions(event: any) {
    this.instance = null
    if (event.name == "Edit") {
      const data = event.data;
      console.log(data, 'customers')
      await this.route.navigate(['../customers/add'], { state: data });
    } else if (event.name == "Add") {
      const data = event.data;
      this.instance = data
      console.log(data, 'add');

      if (!this.viewModalRef) {
        console.log("✖️ button found")
        return
      }
      const viewModalButton = this.viewModalRef.nativeElement as HTMLButtonElement
      viewModalButton.click()
    } else if (event.name == "View") {
      const data = event.data;
      this.instance = data
      console.log(data, 'View');
      if (!this.viewModalRef2) {
        console.log("✖️ button found")
        return
      }
      const viewModalButton2 = this.viewModalRef2.nativeElement as HTMLButtonElement
      viewModalButton2.click()
    }
  }
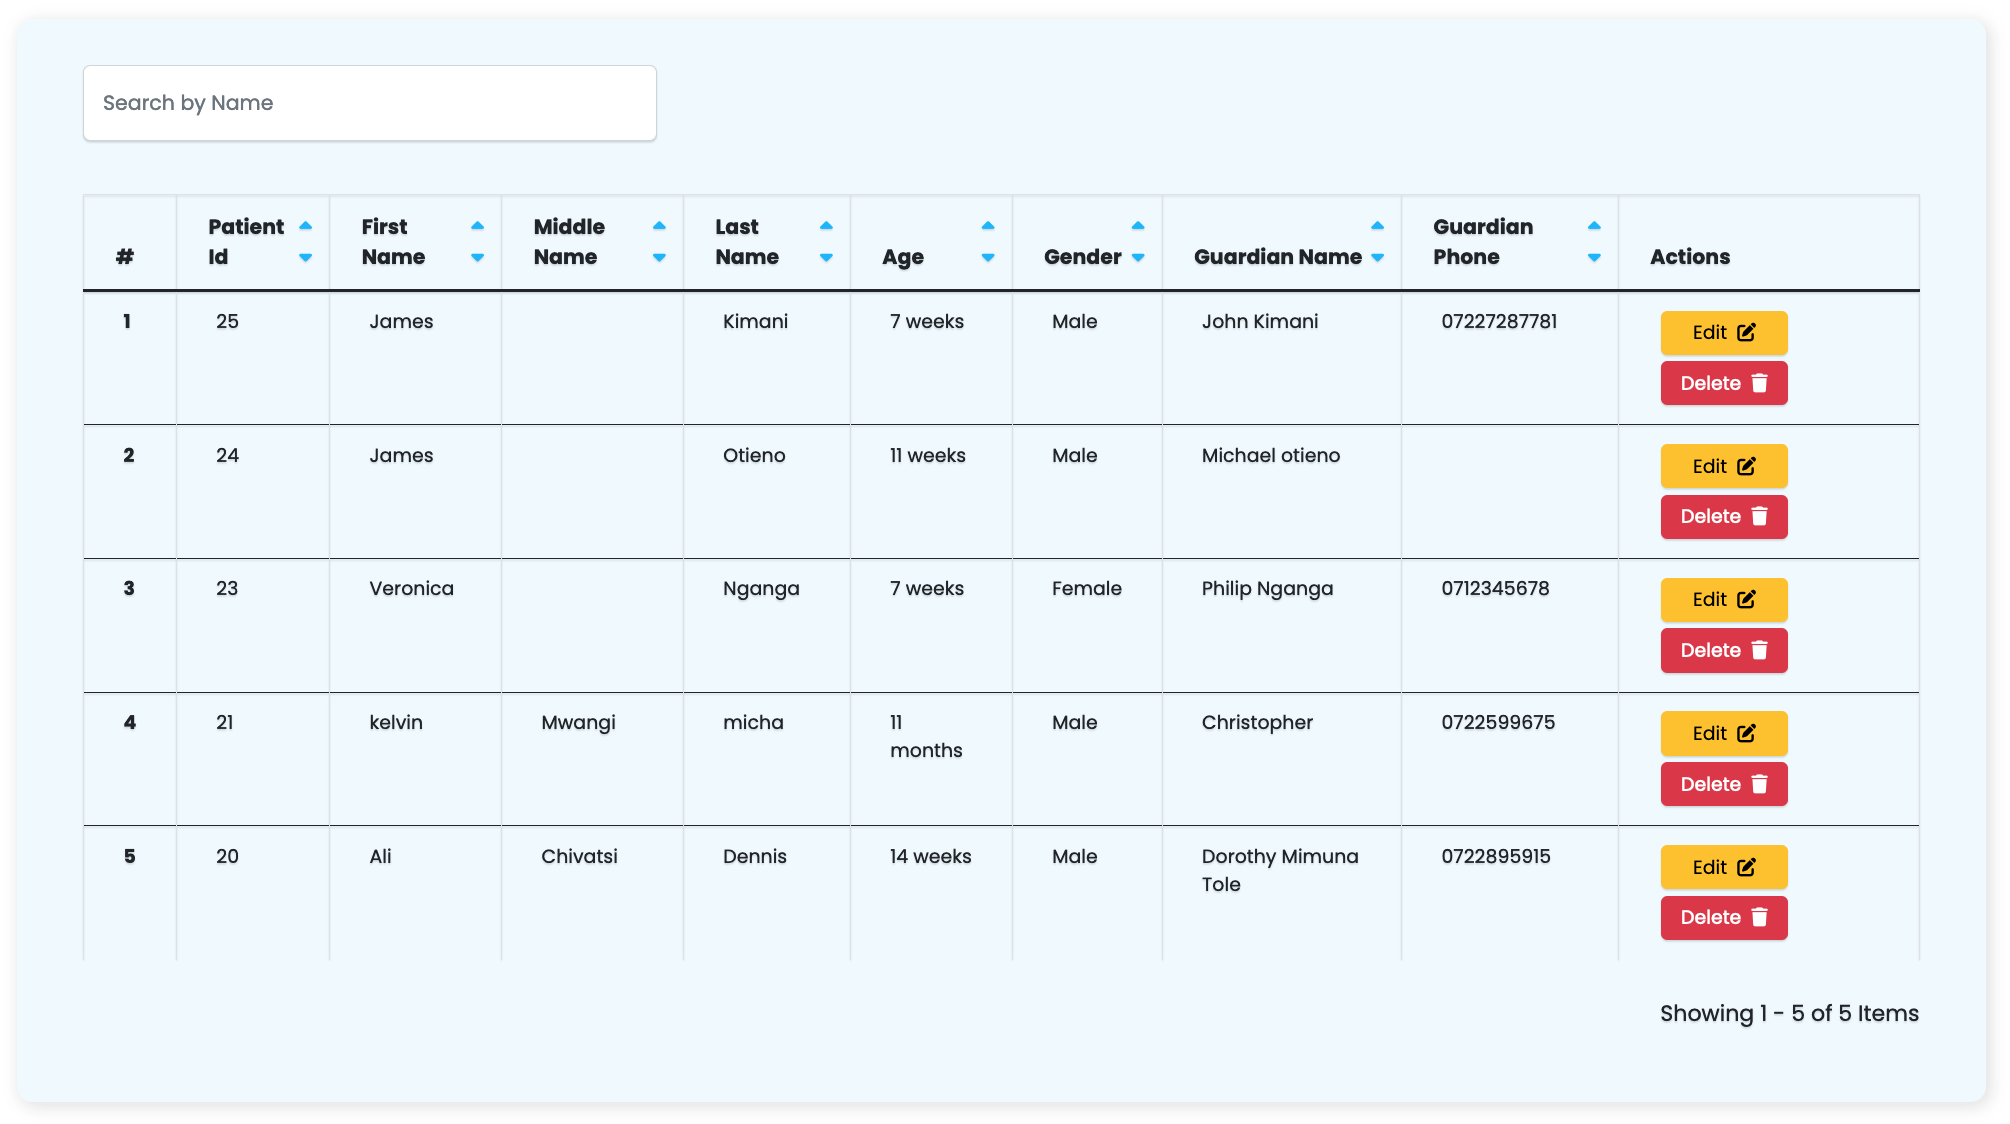
Rendered Table
- The image below shows the expected final output of the rendered table: