Angular Schematics
What are they ?
Schematics are code generators based on descriptive code. Basically, you write some descriptions of what you need and artifacts are generated. Those artifacts could be more code, templates, etc
Introduction
Check out the link below for a detailed intro Introduction
Concepts / Important Vocabulary
| Term | Description |
|---|---|
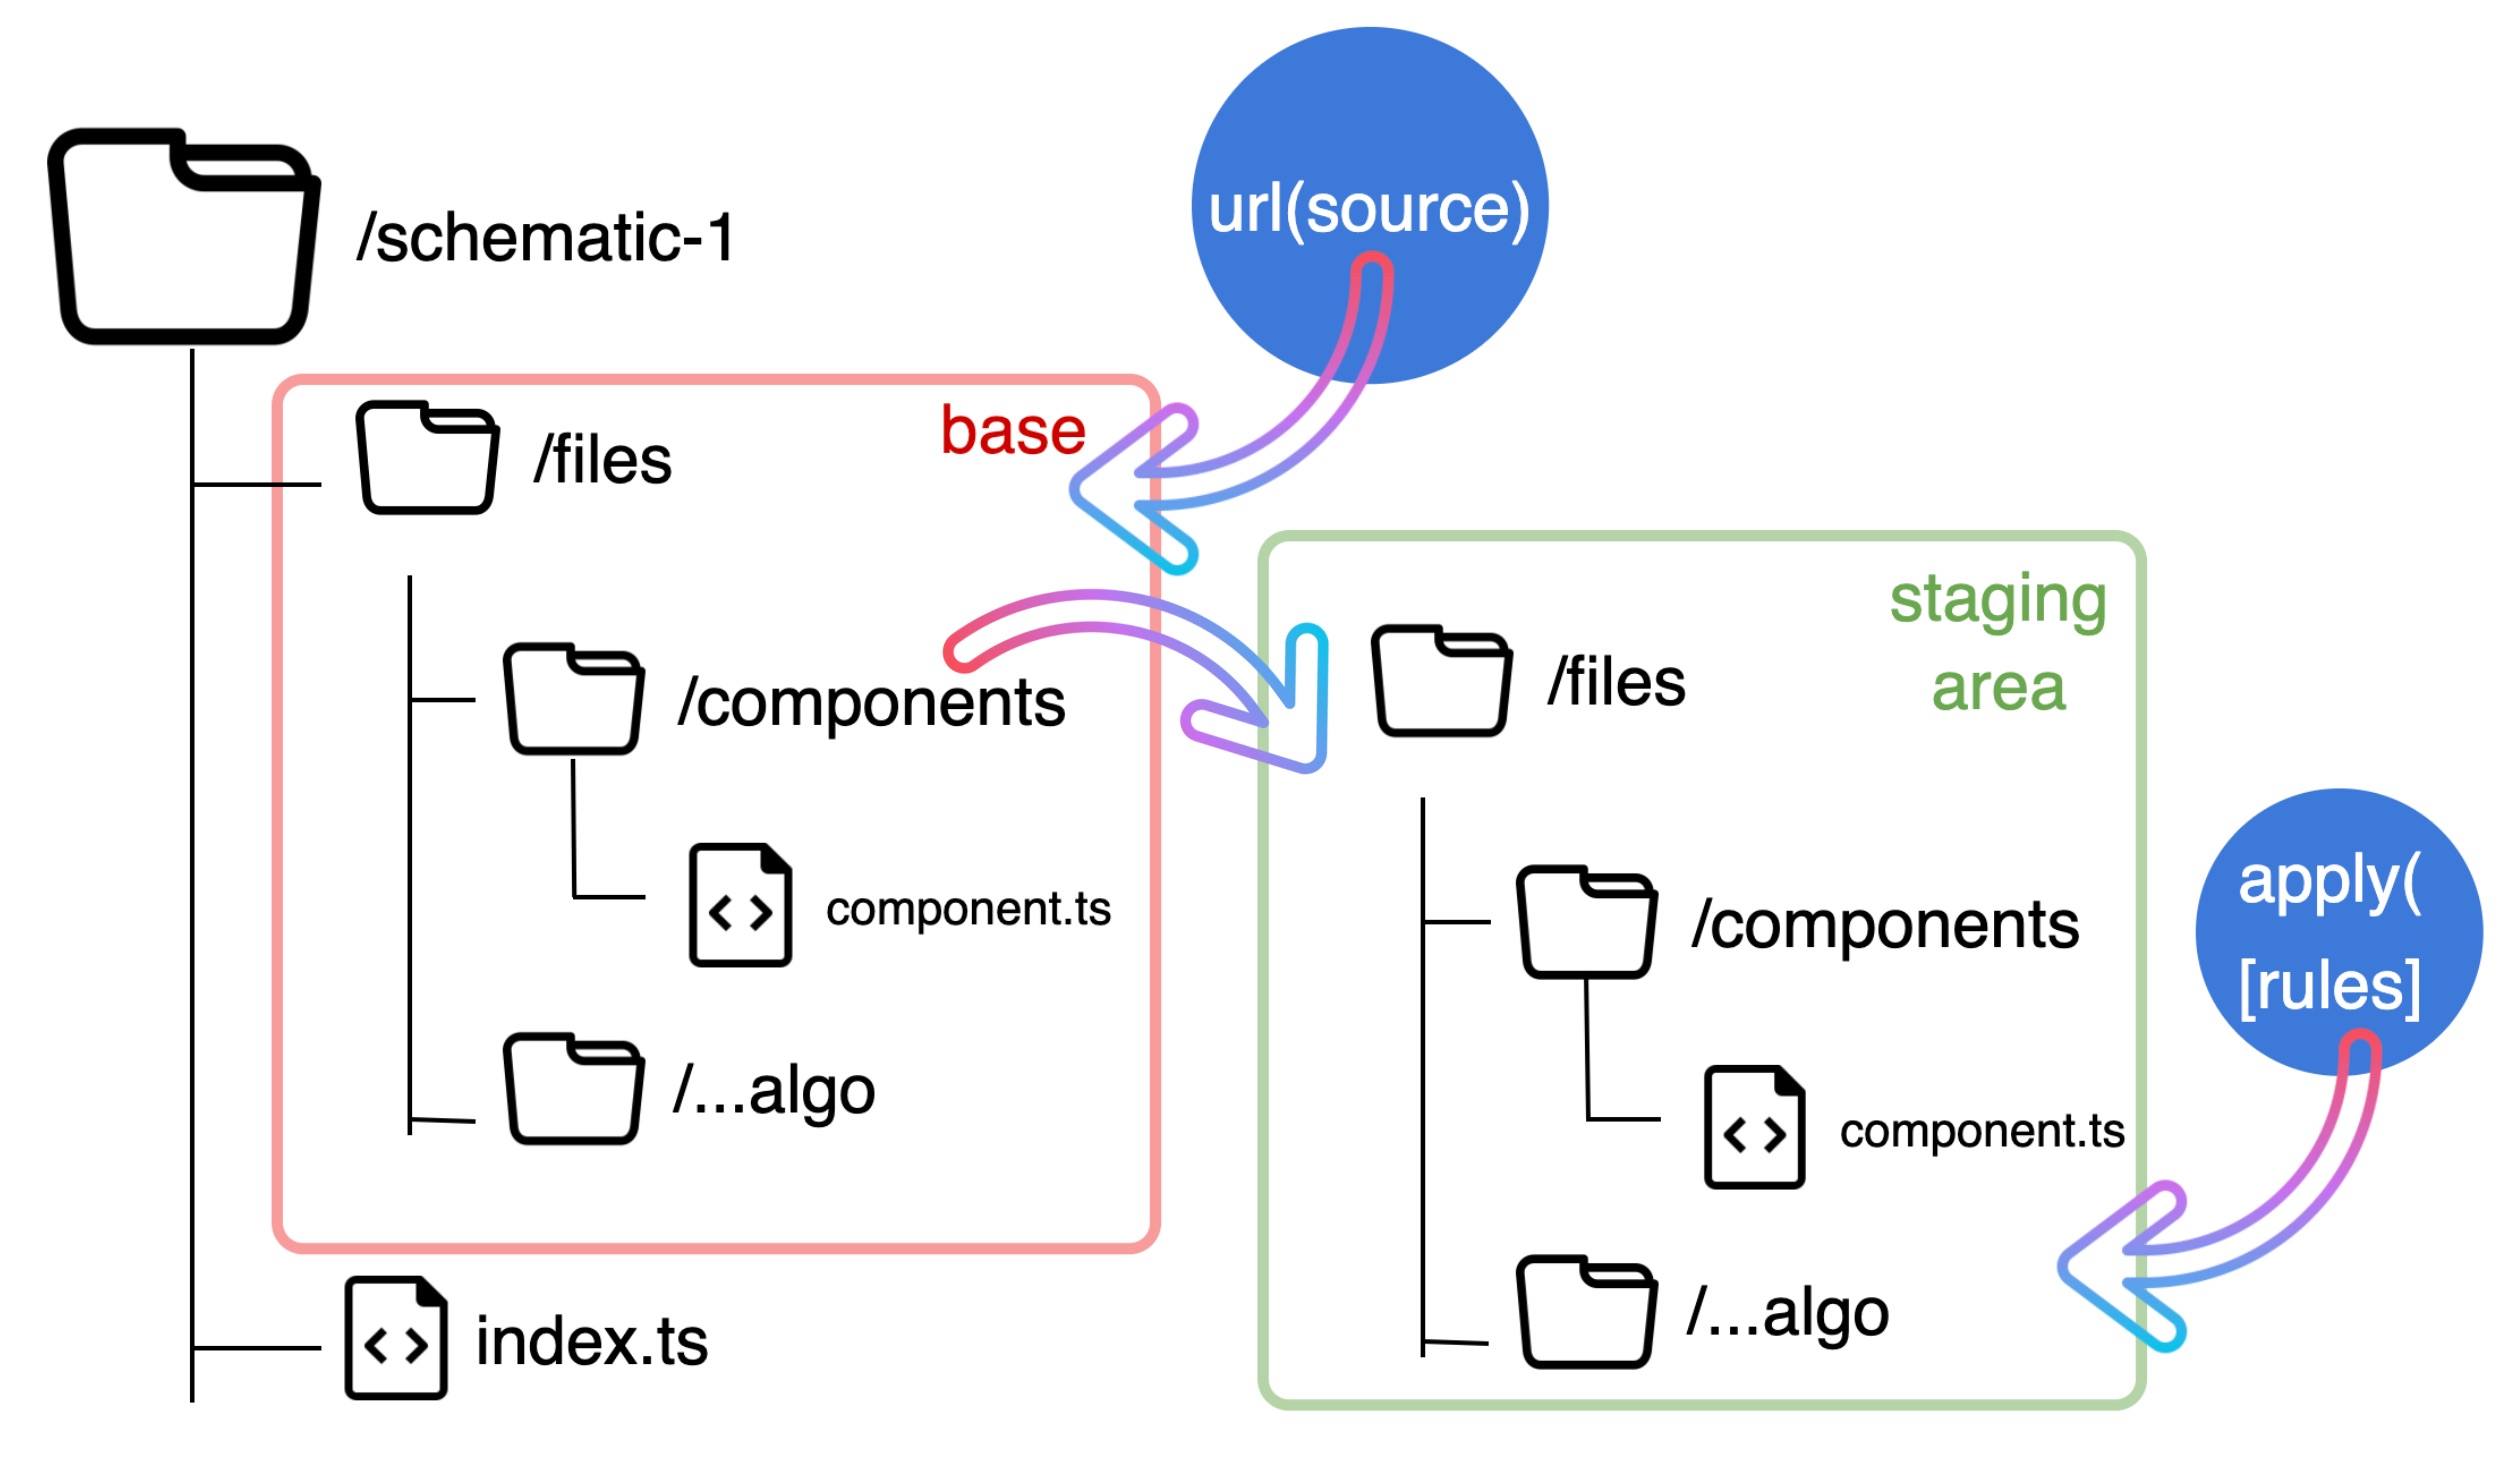
| Tree / source | The Tree or source is the VIRTUAL tree composed by a base (files that actually do exist, and are identical to our file system's content) and the staging area (where all transformations are applied), plus some metadata necessary to work with all. |
/files |
A folder at the root of our schematic that contains files we wish to create in the file system. Ignored by the tsc compiler. In case renamed update tsconfig.json |
| Rule | It defines an object that takes a tree as an argument and returns a new tree after all the transformations have been applied. We can use and return observables. |
index.ts |
A rule factory that is also the entry point of our schematic. |
| Action | The smallest single (atomic) :) transformation that can be appplied on a tree. They are CreateFileAction, DeleteFileAction, OverwriteFileAction, RenameFileAction |
collection.json |
Defines one or more schematics. |
| Aliases | Alternative strings to call the schematic. |
schema.json |
A validation schema for the schematic and it's properties. Optional |
| Prompts | Allow the schematic to interact with the user via the cli. Part of the schema.json |
| Virtual Tree | An representation of the filestystem consisting of the base(existing files) and a staging area where actions to be applied are applied. |
Note on Actions !!
It is very important to understand that the transformations applied do not really modify the base directly! They're applied to the files in the staging area.
To understand this concept, you can think of git, and how every diff, every modification you do of a file, is not really effective unless you commit it to the index. And it does not really affect the upstream unless you push it and merge it!
Checkout the implementations for each at
Schematic API
For more details on this checkout File System API
getDir()
Get the information about the contents of a certain folder.
get()
Get a single file
visit()
useful to transverse the workspace from a path and get information about each file visited.
read()
Read and extract information about a single file source. Returns a buffer.
apply()
Allows you to apply multiple rules to a source and return a transformed tree
url()
This method allows you accessing the base existing in the file system, that wants to be replicated, relative to the root of the schematic that implements it
applyTemplate() | template()
These methods take a rule or several, as arguments, and the path to the files to replicate (also accessed via another method, the url())
Template Syntax
Schematics allows us to implement template syntax in a very flexible way, for example:
import { Injectable } from '@angular/core';
import { HttpClient } from '@angular/common/http';

@Injectable({
  providedIn: 'root'
})
export class <%= classify(name) %>Service {
  constructor(private http: HttpClient) { }
}
Set Up
For more information More information
Install
Create a blank schematic
Outputcd into the schematic root directory
{
  "$schema": "../node_modules/@angular-devkit/schematics/collection-schema.json",
  "schematics": {
    "indepth-dev-schematic": {
      "description": "A blank schematic.",
      "factory": "./indepth-dev-schematic/index#indepthDevSchematic"
    }
  }
}
import { Rule, SchematicContext, Tree } from '@angular-devkit/schematics';

// You don't have to export the function as default. You can also have more than one rule factory
// per file.
export function indepthDevSchematic(_options: any): Rule {
  return (tree: Tree, _context: SchematicContext) => {
    tree.create('readme.md', '#This is the read me file');
    return tree;
  };
}
Test
Success

Note
Because you're at root level, you don't need to pass the name of the collection, so it's . followed by a colon : and the name of the schematic, in this case indepth-dev-schematic . In the future, we will add an alias to the schematic, in order to invoke it with a shorter, or more user friendly name.
Passing options as arguments from the CLI
import { Rule, SchematicContext, Tree } from '@angular-devkit/schematics';
import { join } from 'path';
import { capitalize } from '@angular-devkit/core/src/utils/strings';


// You don't have to export the function as default. You can also have more than one rule factory
// per file.
export function indepthDevSchematic(_options: any): Rule {
  return (tree: Tree, _context: SchematicContext) => {
    const name: string = _options.name;
    const content: string = _options.content;
    const extension: string = _options.extension || '.md';

    tree.create(join(`${name}${extension}`), capitalize(content));

    return tree;
  };
}
Build and run with the test options
Getting rid on <any> options
Create a schema
export interface Schema {
  name: string;
  content: string;
  extension?: string;
}
Create a schema.json file for validation
Update the collections.json file to reflect the same.
| src/collections.json | |
|---|---|
Input prompts for custom schematics
Options
Prompts are of three types, textual input, either string or number, decision, or a yes or no ( boolean maps to true or false) and list featuring an enum with subtypes.
| src/indepth-dev-schematic/schema.json | |
|---|---|
Aliases
| src/collections.json | |
|---|---|
Now you can run
Generating the schematic from an Angular app
Let's start by linking the package to our current node version, executing
Note
This links it to the global packages
Create a new Angular app
Create a symlink to the schematic package Run this from the root folder of the angular project
Below is the modified version of the schematic
import { Rule, SchematicContext, Tree } from '@angular-devkit/schematics';
import { join } from 'path';
import { capitalize } from '@angular-devkit/core/src/utils/strings';
import { Schema } from './schema';


// You don't have to export the function as default. You can also have more than one rule factory
// per file.
export function indepthDevSchematic(_options: Schema): Rule {
  return (tree: Tree, _context: SchematicContext) => {
    const name: string = _options.name;
    const content: string = _options.content;
    const extension: string = _options.extension || '.md';

    const path = join(`${name}${extension}`);
    const angularConfig = 'angular.json';

    // Let's make sure we're in an angular workspace
    if (!tree.exists(angularConfig)) {
      _context.logger.error('This is not an Angular workspace.');
      // throw new SchematicsException('???This is not an Angular worksapce! Try again in an Angular project.');
    } else {
      if (!tree.exists(path)) {
        tree.create(path, capitalize(content));
      } else {
        _context.logger.error(`${path} File already exists.`);
      }
    }
    return tree;
  };
}
Warning
Make sure to run npm run build from the schematic root folder each time to modify
From the Angular root folder, run
EXAMPLE
Create a new schematic