Test Driven Development
INTRODUCTION
Test Before vs Test After : Traditional Testing
A big question in software development is whether to test software before we code or after. Tradition has always been to code first then write test cases for the code we've already written. This type of testing has a common point of failure in that, sure the system would would pass the tests because the tests made sure of that, but working on the tests would gradally become more and more difficult. How so? Imagine we have some already existing code and now we're writing tests for it. We are bound to encounter the following problems to name just a few:
- Untestable Code : Since the code wasn't designed/written to be testable, there's stuff we can't access in the code for testing. Hence asserting that the code did what we think it should would be difficult.
- Tests are highly coupled with the code : We end up writing tests that are very specific to the code we've already written. This would mean that chaninging the code would mean having to rewrite the tests for the code as well.
- Testing the code rather than requirements : We end up testing that the code that we wrote is the code that we wrote, which isn't very helpful. Attention shifts from, 'Does the code do what it's supposed to do?' and goes to 'Does the code work regardless?'
A better approach to testing is writing unit tests even before we code. In other words, Test Driven Developement ...
TEST DRIVEN DEVELOPMENT
What it is
Test-driven development (TDD) is a software development process relying on software requirements being converted to test cases before software is fully developed, and tracking all software development by repeatedly testing the software against all test cases. This is as opposed to software being developed first and test cases created later. 1.
In a nutshell : - Test driven development means just that i.e. development is driven by tests i.e the tests come first!. - TDD puts emphasis on Specifications(Requirements) instead of Tests - TDD is based around Confirming Behaviour rather than Testing Code.
How to do it (The Steps)
The following sequence is based on the book Test-Driven Development by Example :

- Add a test : The adding of a new feature begins by writing a test that passes if the feature's specifications are met. The developer can discover these specifications by asking about use cases and user stories. A key benefit of test-driven development is that it makes the developer focus on requirements before writing code. This is in contrast with the usual practice, where unit tests are only written after code.
- Run all tests. The new test should fail for expected reasons : This shows that new code is actually needed for the desired feature. It validates that the test harness is working correctly. It rules out the possibility that the new test is flawed and will always pass.
- Write the simplest code that passes the new test : Inelegant or hard code is acceptable, as long as it passes the test. The code will be honed anyway in Step 5. No code should be added beyond the tested functionality.
- All tests should now pass : If any fail, the new code must be revised until they pass. This ensures the new code meets the test requirements and does not break existing features.
- Refactor as needed, using tests after each refactor to ensure that functionality is preserved : Code is refactored for readability and maintainability. In particular, hard-coded test data should be removed. Running the test suite after each refactor helps ensure that no existing functionality is broken. Examples of refactoring:
- Moving code to where it most logically belongs
- Removing duplicate code
- Making names self-documenting
- Splitting methods into smaller pieces
- Re-arranging inheritance hierarchies
- Repeat : The cycle above is repeated for each new piece of functionality. Tests should be small and incremental, and commits made often. That way, if new code fails some tests, the programmer can simply undo or revert rather than debug excessively.
This workflow is sometimes called Red-Green-Refactoring, which comes from the status of the tests within the cycle.
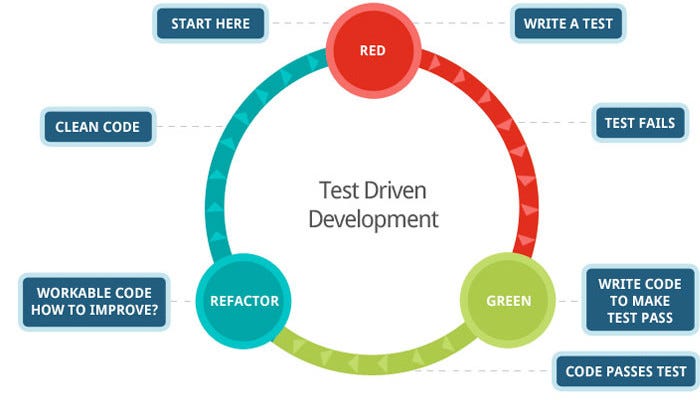
- The red phase indicates that code does not work.
- The green phase indicates that everything is working, but not necessary in the most optimal way.
- The blue phase indicates that the tester is refactoring the code, but is confident their code is covered with tests which gives the tester confidence to change and improve our code.
The Benefits
- Early bug notification
- Better Designed, cleaner and more extensible code.
- Confidence to Refactor
- Good for teamwork
- Good for Developers
EXAMPLE : Coding a Stack 5
Coding Challenge : Implement a stack data structure without using a JS array that implements the LIFO principle.
Solution : Using test driven developement to solve this challenge we would first write the test cases based on the requirements of the challenge then go ahead to develop the stack data structure.
Step One
The requirements to create a stack are that : 1. It should be empty at initialisation 2. We should be able to push items into the top of the stack 3. We should be able to pop the last item pushed into the stack.
Thus we write tests for each of these requirements before we write the code that satisfies the requirement.
describe('My Stack', () => {
    it.todo('is created empty', () => {});

    it.todo('can push to the top', () => {});

    it.todo('can pop off', () => {});
})
Step Two
We write the first test for the first requirement as follows :
describe('My Stack', () => {

    let stack;

    beforeEach(() => {
        stack = new Stack();
    });

    it('is created empty', () => {
        const stack = new Stack();

        expect(stack.top).toBe(-1);
        expect(stack.items).toEqual({});
    });
Step Three
We then write the code that would pass this test :
class Stack {
    constructor() {
        this.top = -1;
        this.items = {};
    }
describe('My Stack', () => {

    let stack;

    beforeEach(() => {
        stack = new Stack();
    });

    it('is created empty', () => {
        const stack = new Stack();

        expect(stack.top).toBe(-1);
        expect(stack.items).toEqual({});
    });
When we run the code, the test passes and we can proceed to write tests and code for the remaining requirements. Following the same procedure, the final code will look like this :
class Stack {
    constructor() {
        this.top = -1;
        this.items = {};
    }
    // written after the second test is written
    get peek(){
        return this.items[this.top];
    }

    push(value) {
        this.top += 1;
        this.items[this.top] = value;
    }

    // written after the third test is written
    pop(value) {
        this.top -= 1;
    }
}


describe('My Stack', () => {

    let stack;

    beforeEach(() => {
        stack = new Stack();
    });

//upon running should throw a RefferenceError: Stack is not defined
    it('is created empty', () => {
        const stack = new Stack();

        expect(stack.top).toBe(-1);
        expect(stack.items).toEqual({});
    });

//second test case
//upon running should throw a TypeError: stack.push is not a function
    it('can push to the top', () => {
        stack.push('🥑')
        expect(stack.top).toBe(0);
        expect(stack.peek).toBe('🥑')
    });

//third test case
//upon running should throw a TypeError: stack.pop is not a function
    it('can pop off', () => {
        stack.pop()
        expect(stack.top).toBe('🥑');
        expect(stack.peek).toBe(-1);
    });
})
REFERENCES
Article References
- Test Driven Devlopment
- Test Driven Devlopement (Tutorial Example)
- Test Driven Devlopment : What it is, what it is not
- Steps of Test Driven Development